Pages

April 26, 2013

DIY: Framed Memo Board


In an effort to get more organized and to clear out some closet space, I wanted to use this frame to make a memo board for my office (a ridiculous work in progress). I used to work at a frame shop so there were tons of deals that I couldn't pass up, so I have a closet full of unused frames. Having these frames around has worked out so far because I change out our wall decor seasonally, but I am in desperate need of more storage space, so it's use-it or lose-it time!

I have always loved this particular frame so I had to snag it when it went unused for a custom frame order and went on clearance. The old world style just doesn't jive with the decor in our house, though, so I had to bust out the spray paint and switch up the look a bit (don't hate me, Mom!).
frame with paint
I sprayed a quick layer of primer, followed by a couple of coats of the white gloss paint. 
painted frame
I bought an unframed cork-board at a local craft store for about $15. I wanted it to have more of a fabric, memo board look, than the look of actual cork. I had some coarse linen fabric leftover from a previous project that I wanted to glue on the surface of the cork to get that fabric texture. 
tacky glue

April 12, 2013

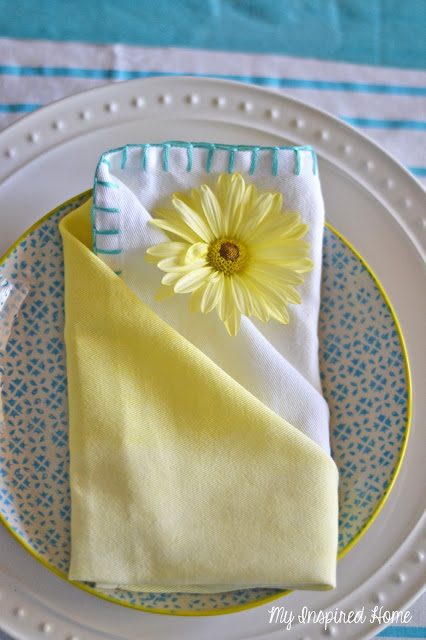
Ombré Fabric Napkins

I am in the midst of a ton of spring projects, one of which is a spring table-scape. I was having a terrible time finding napkins that suited my style and the colors that I was looking for, so what better to do then add another project to the pile!

What you need:

  1. 4-6 White Cotton Napkins, washed 
  2. Fabric Dye(s) of your choice (I used Lemon Yellow and Tan)
  3. Salt
  4. Rubber Gloves
  5. Plastic Tablecloth or Covering
  6. Medium Plastic Container
  7. Skirt Hanger
  8. Dish-Washing Liquid
  9. Measuring Spoon

Prep the Dye

  • Bring 2 gallons of water to a boil on the stove or in the microwave  (I tried both ways and found it was easier just to use the stove-top so it could be done all at once instead of in several batches).
  • To achieve the shade of yellow for these napkins, I used 3 tablespoons of the Lemon Yellow and 3/4 of a teaspoon of Tan, and combined that with 2 cups of water and 1 cup of salt in the medium-sized plastic bin.
  • After the water has come to a boil, slowly pour into the container with the dye mixture, followed by a quick squirt of dish-washing liquid. Stir with a plastic mixing spoon until the salt is fully dissolved.

Dye the Napkins

  • After you have washed the napkins, if you have dried them, re-wet them. Stack all wet napkins together and clip them together using a skirt hanger. I kept the tags on  mine during the dying process so that I had a reference point to keep them all facing the right direction. The packaging says they are 16x16, however I found that they are not completely square, so i wanted to make sure the ombre ran vertically on the longest side.
  • Dip the bottom quarter of the napkins into the dye for about 1 minute, followed by dipping the bottom half into the dye for not more than 30 continuous seconds. If you don't like the effect continue to quickly lift it in and out of the dye until you are happy with the gradient.

  • For one second dip the bottom three quarters of the napkins into the dye and immediately rinse them in cold water, making sure to rinse them from the top, down, so that the dye rinses toward the darkest part of the napkin.
  • After they are thoroughly rinsed so that the water runs clear, hang them dry with the darkest part of the napkin at the bottom. If you have 4-6 skirt hangers, they will dry much faster if they are hung separate.
  •  Once they have completely dried, run them through the wash with cold water and dry them. You will most likely need to iron them as well.

Adding the Blanket Stitch

I wanted to add a little something extra to make these a little more fun. They looked good without the stitching, but I thought the stitching added what I was looking for to make a more unique look.
I used two bundles of thread (brand: DMC, color: 959) to run the blanket stitch on just the top and bottom. I also used the full thickness of the embroidery thread to get a bolder line with the stitch. It had been quite a while since I have done a blanket stitch, so I used the following diagram as a refresher:

aaand....you're done!