Pages

September 16, 2013

Go into the White..Awesome White Kitchens

Oh man..August was just a mess! And now here we are more than half into September and I'm just regaining my focus. We sold our house in July and moved out on August 20th - so there was nothing but packing and paperwork in our lives pretty much all of August. The good news is we finally closed on the old house on the 30th and we made all of our design decisions for the new house. Unfortunately the new house only looks like this:

But I wanted to share some of our inspiration for the decisions that we made on the new house. There are a ton of ways the money can get away from you and the Kitchen is where you seem to spend the VAST majority of the fundage...and that is indeed what we did as well. We are going all white..with a little bit of gray. It's going to be bright and clean and AWESOME...I can't wait!!

This is one of my favorites because the hood and backsplash situation are very similar to what we are going to have. We are bringing a little bit of contrast in between our whitish counter tops and white cabinets.
http://www.decorpad.com/photo.htm?photoId=93671 photo 353f72fd01ca_zpsa0b18ea7.png
Decor Pad
An alternative to the gray subway that we are doing on our kitchen backsplash is picking up some contrast using gray grout. It really makes these tiles stand out. I will always love the classic subway look, but the quatrefoil tile in the next kitchen is definitely a cool look
http://houseandhome.com/design/open-tidy-kitchen-storage photo 052611-HHM-0669_final_SUP_HH_OC11_0_zpsc1266e54.jpg
House and Home
http://www.hgtv.com/designers-portfolio/room/cottage/kitchens/10436/index.html#/id-10436 photo RS_Anisa-Darnell-Kitchen-Island_s3x4_lg_zpsa2ff29af.jpg
HGTV
The character in this next one is great. I love the striped island bench and the grey island (ahem - stay tuned...way tuned in...we are planning a trim-wrapped, painted island in the new house, but it might be a minute so bear with me). The schoolhouse pendants are my new favorite thing, I will find somewhere in the new house to hang them...just wait! 
http://www.impressiveinteriordesign.com/white-kitchen-design-ideas-to-inspire-you-33-examples/ photo kit1_zps7a6c7f8a.jpg
Impressive Interior Design
What I really like about this one is the simplicity and the stark contrasts. The dark furnishings and counter tops make the clean lines of the cabinetry look more dramatic.
http://houseandhome.com/design/stately-country-kitchen photo Kitchen20AyersCliff_zpsa01f6bbf.jpg
House and Home
These next few prove to me that an all white kitchen can still be cozy and warm. 
http://www.southernliving.com/home-garden/decorating/white-kitchens-00400000057076/page6.html photo right-white-kitchen-l_zpsdcfe3e6a.jpg
Southern Living
http://www.hgtv.com/designers-portfolio/room/cottage/kitchens/9646/index.html photo DP_Drury-Design-White-Cottage-Kitchen-3_s4x3_lg_zps14ff5e74.jpg
HGTV
http://houseandhome.com/design/lovely-lakeside-cottage-kitchen photo 100610-HHM-2318_SUP_HH_JY11_zps6e947573.jpg
House and Home
And then there are always those that you see and know that your set up will never be THAT nice, all there is to do is have a mini pity party (first world problems, I know!) and then say…”How do I do this with a 10th of the budget?” and move forward. These next three are those to me. I mean seriously with the Carrera marble and the coffered ceilings, the REALLY nice cabinets and light fixtures AND those windows…they’re just crazy awesome!
http://www.hgtv.com/designers-portfolio/room/transitional/kitchens/11409/index.html photo RS_Cohen-and-Hacker-White-Kitchen_s3x4_lg_zps300d2ff6.jpg
HGTV
Houzz
I think this is a nice marriage of casual and classy. Not quite as over-the-top-awesome as the previous pictures that make me drool like a Saint Bernard, but it is still elegant. This is pretty much what we are going for in the new kitchen: casual elegance. 
http://www.architecturaldigest.com/decor/2013-01/white-kitchens-kelly-klein-sting-michael-smith-jenni-kayne-slideshow_slideshow_item19_20 photo item19renditionslideshowWideHorizontalwhite-kitchens-20_zpse829a0b2.jpg
Architectural Digest
While I realize the practicality of all white is lacking, I figure if I'm going to do any room in white, it should be the kitchen. It's all washable surfaces...we are staying away from white fabric for the time being. What are your thoughts, feelings, opinions on the all white kitchen? Does it leave you craving color, or are you with me, leave the color to the accessories? 

Follow my blog with Bloglovin

August 1, 2013

August Playlist


It's that time again! Holy cow, July went by too fast! It has been a whirlwind at our house. Stay tuned for an update on selling our house (or just follow me on any social media outlet for little snippets). I have another crazy, jammy, eclectic  mix of indie rock for you on the August playlist this month. I'm a big fan of irony and not a fan at all of the August heat, so I hope you can make the connection in some of the songs I chose. I need music to get stuff done to, so here it is! ENJOY, and, as always, more songs will be added throughout this hot, sweaty month. I anticipate more angst as the month progresses - get ready.


July 18, 2013

Washi Tape Pencil Cup

When we were going through the house to stage it and make it look like nobody really lived there, I decided this black mesh-metal desk organizer was way too, "someone-lives-here-and-has-a-lot-of-crap."

I still needed to retain a little of the utility in my office, so I found some washi tape and a plastic pencil cup on clearance for $2 and did a super-quick makeover.


I got rid of the lid (and I'm a poet and didn't know it - not above 4th grade humor) and lined up the first row of tape just below the lip on the top of the container. After I worked my way around the first row, I made a cut and lined up the next row like wallpaper. I think I ended up with 5 rows or so. 


At the bottom, I just wrapped the tape around the bottom edge and called it a day!


Or I would have...but it still needed some more color. I grabbed a thinner Kelly green roll of washi tape to finish of the top edge of the container. 


BOOM! Only five minutes to awesome! Throw in some office supplies and NOW you can call it a day. Like I said, super quick, super easy. 


July 9, 2013

Making the Decision: New or Pre-Existing Home

I hope everyone had a wonderful and safe 4th of July weekend. Some big (scary) decisions were made over here at our house!  On Thursday, we headed over to a model home and floated the idea of building a new home, and therefor selling our current home. I know! Are you hyperventilating with me people!?

It's a decision that, right now, seems like it was made hastily, but we have been discussing it for years. It's always been one of those things that would be nice to do, but (in our minds) it would be a long way off for us. All this talk of economic climate and the housing market made us think that we would not be selling this house (that we essentially bought as an investment) any time soon. ESPECIALLY given that, a few short months ago, houses the same size were going for LESS than what we paid four years ago. Let's talk about how hard that pill was to swallow!! 


Then the market took a swift turn around the beginning of the year and people that Tony work with (in the housing industry) were basically saying, "If you don't put your house on the market RIGHT NOW, you're just stupid!" So, needless to say, the decision was upon us like a hard slap in the face. This is something we would have preferred to have more time to prepare for, but we always knew this was not the "forever" house, so I'm not really sure what I expected. 
In regard to buying new or pre-existing, there were a lot of considerations to make:


  1. We would have to put a contract on the new house under a contingency. That basically means that we would have to sell our house in 90 days so that we don't potentially loose the new house. Not only will the builder not sell us the new house while we are still paying a mortgage on another house (assuming we are not renting it out, which we are NOT), but we will most likely not even be able to get funding if we do not sell this house. NO PRESSURE!!
  2. We will have to move in with my mother during the gap between the sale of our home and the closing of the new home. Which means we will basically be moving twice and have to store all of our junk in a storage unit for a few months. 
  3. If we buy pre-existing, are we prepared to start all over with the renovations that are already done in our current house and would already be done in the new build?
  4. When you build a new house, you cannot lock in your interest rate until a maximum of 60 days before you close your house. Since this is "THE HOTTEST MARKET EVER!", are the interest rates going to skyrocket by the time we are able to lock in our interest rate (probably around early October)??
None of these things amount to the end of the world, but they are collaboratively SUPER stressful. As previously stated, this will be the last time we do this for a VERY long time.

Ultimately we decided to bite the big, scary bullet and go with the new build. Since the decision was made it has all snow-balled rather quickly. Thursday we held our lot, Friday we got pre-approved, Saturday we got the current house in order, Sunday we met with a Realtor to sell the current house and then we went and put a deposit down on the new house and Monday there was a big FOR SALE sign in our front yard. So when I say "snow-balled", what I actually need you to think of is that humongous boulder thing that comes barreling straight at Indiana Jones, just load up a hole with snakes and rock some dramatic music and you get the picture. 

These have been an emotional few days for both of us. We are so excited to get into a house that we expect to be in for AT LEAST a decade, but we are very sad to see our current house go. It was just terrible sitting across from the Realtor and hearing that all of the hard work that we have put into this house will not necessarily be reflected in our back account at the end of all this. That being said...we will be doing some SERIOUS saving for the next few months. This is going to be an amazing adventure and I look forward to sharing all of the awesomeness with you all!! Tell me at least ONE of you has been through this?? 

July 2, 2013

July Playlist


Hey all! Music is a big part of what inspires me and keeps me focused and motivated. I listen to Spotify all day at work to keep focused and then come home and listen more to get pumped. For those of you that are familiar with Spotify, move on and follow my playlist!! For those of you who are newbies, here is a quick idea of how it works:

Spotify is like Pandora in the sense that it has radio stations that are generated based on albums, artists, genres, etc, but Spotify gives you the ability to make playlists and other people can follow. WARNING: This feature is only free on your desktop/laptop. You have to pay $10 a month in order to have this feature on your mobile devices. You can also find your friends on Spotify to check out what they are listening to in real time (if you have friends that listen to the same type of music it really comes in handy because you can listen to what they are listening to, as they are listening to it...spooky and stalkerific...but neat). The playlists I compile will all be on Spotify. 

I listen to an eclectic mix that contains a mostly recent Indie and 80's New Wave, but also incorporates some folk, jazz, oldies. There are really only a couple of genres that aren't my bag. I think music is a great, SUBJECTIVE tool to evoke, or even get out of, a particular mood. My July playlist is filled with light, upbeat, summery tunes with a slight American undertone in honor of the 4th. It's perfect background noise for a summer barbecue or for summer crafting!! All you have to do is click the link above or picture below to follow my wacky playlist. I will continue to add on to it throughout the month so it will have more tracks....Happy July!!


Also, I'm always looking for new, funky bands to check out, so if you know of any that have a similar vibe that I just HAVE to check out, let me know and maybe you will see it on the list soon!! 


June 23, 2013

Cooking Class: Seafood 101


In an effort to both further our attempts at a healthy lifestyle and find something new to do as a couple, Tony and I signed up for a one night cooking class: Seafood 101. The class was held at one of our local markets called Central Market. If you're in Texas I recommend that you find your local location. We don't eat a lot of fish in the Musick house, not because we don't like it, but because I'm not super confident in my ability to select and cook GOOD seafood, especially where we live. We are pretty much land locked and only have close access to gulf seafood, so much of what is purchased here has to be frozen and flown in, but there are places that you can buy really great seafood, such as Central Market. So we figured if there was a place to learn about and find the good stuff, it was here. So let's dig right in...

The first thing that we did was take a tour of their seafood market to learn more about selecting appropriate seafood for a particular season or recipe. All of the fish in their market is labeled with the location it was caught, so we also learned which fish were best from particular regions of the world. We also got some insider tips on how their particular market worked in regards to the safety and maintenance of their fish.

There were a couple of things that I really loved about this class in particular: (1) We used a couple of kinds of fish that I never even eaten, let alone prepared. (2) We used a different preparation method for 5 different dishes, so there was really got a broad spectrum of ways that fish can be cooked.
When you select a class, you can elect a hands on approach or just a demonstration. We went hands on so we could get up close and personal with the fish. They have you chop, taste, mix, even handle the cooking.

May 8, 2013

Strawberry Shortcake Cupcakes

I wanted to come up with a healthy dessert option for Mother's Day. We all know where the majority of the calories come from when you eat a cupcake...the frosting. This recipe is already low-calorie and low-fat because some of the butter has been replaced with sour cream (so it is still super moist) and the frosting has been replaced with fruit-based icing and a dollop of fat-free Cool Whip. Making these changes allows this bad-boy to ring in with a calorie count of only 230. So that being said, let's dive in!

The Grocery List:
  • 1 stick of salted butter (1/2 cup)
  • 1 (8 oz) container of fat-free sour cream
  • 1 1/2 cups of granulated sugar
  • 2 teaspoons vanilla extract
  • 1/2 cup of egg substitute
  • 2 cups all purpose flout
  • 1 teaspoon baking soda
  • 1 teaspoon salt
  • 3/4 cup low-fat buttermilk
  • 1 lb strawberries
  • 1 lemon
  • 1 cup powdered sugar
  • Cool Whip Free
  • Cupcake liners
The Prep: 

Start by melting the stick of butter and set aside to let cool. 
Preheat the oven to 350 degrees. Combine all of the dry ingredients (flour, baking soda and salt) in a medium-sized bowl with a whisk. Also, while the butter is cooling, now would be a good time to slice up some strawberries for garnish. I only used one slice per cupcake, which came to only about 8-9 small strawberries. Make sure you reserve at least 4 medium-large strawberries for the glaze. 

The Batter:

Now that your butter is cooled (or at least, not HOT), it's time to make some batter! Using an electric mixer, whisk the sour cream and melted butter until well combined. Add the sugar and vanilla. Whisk for an additional 2-3 minutes at medium speed. Add the egg substitute and blend for another 2 minutes on medium. 

April 26, 2013

DIY: Framed Memo Board


In an effort to get more organized and to clear out some closet space, I wanted to use this frame to make a memo board for my office (a ridiculous work in progress). I used to work at a frame shop so there were tons of deals that I couldn't pass up, so I have a closet full of unused frames. Having these frames around has worked out so far because I change out our wall decor seasonally, but I am in desperate need of more storage space, so it's use-it or lose-it time!

I have always loved this particular frame so I had to snag it when it went unused for a custom frame order and went on clearance. The old world style just doesn't jive with the decor in our house, though, so I had to bust out the spray paint and switch up the look a bit (don't hate me, Mom!).
frame with paint
I sprayed a quick layer of primer, followed by a couple of coats of the white gloss paint. 
painted frame
I bought an unframed cork-board at a local craft store for about $15. I wanted it to have more of a fabric, memo board look, than the look of actual cork. I had some coarse linen fabric leftover from a previous project that I wanted to glue on the surface of the cork to get that fabric texture. 
tacky glue

April 12, 2013

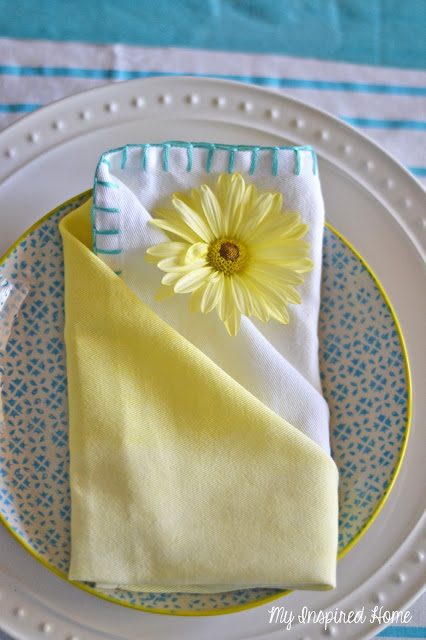
Ombré Fabric Napkins

I am in the midst of a ton of spring projects, one of which is a spring table-scape. I was having a terrible time finding napkins that suited my style and the colors that I was looking for, so what better to do then add another project to the pile!

What you need:

  1. 4-6 White Cotton Napkins, washed 
  2. Fabric Dye(s) of your choice (I used Lemon Yellow and Tan)
  3. Salt
  4. Rubber Gloves
  5. Plastic Tablecloth or Covering
  6. Medium Plastic Container
  7. Skirt Hanger
  8. Dish-Washing Liquid
  9. Measuring Spoon

Prep the Dye

  • Bring 2 gallons of water to a boil on the stove or in the microwave  (I tried both ways and found it was easier just to use the stove-top so it could be done all at once instead of in several batches).
  • To achieve the shade of yellow for these napkins, I used 3 tablespoons of the Lemon Yellow and 3/4 of a teaspoon of Tan, and combined that with 2 cups of water and 1 cup of salt in the medium-sized plastic bin.
  • After the water has come to a boil, slowly pour into the container with the dye mixture, followed by a quick squirt of dish-washing liquid. Stir with a plastic mixing spoon until the salt is fully dissolved.

Dye the Napkins

  • After you have washed the napkins, if you have dried them, re-wet them. Stack all wet napkins together and clip them together using a skirt hanger. I kept the tags on  mine during the dying process so that I had a reference point to keep them all facing the right direction. The packaging says they are 16x16, however I found that they are not completely square, so i wanted to make sure the ombre ran vertically on the longest side.
  • Dip the bottom quarter of the napkins into the dye for about 1 minute, followed by dipping the bottom half into the dye for not more than 30 continuous seconds. If you don't like the effect continue to quickly lift it in and out of the dye until you are happy with the gradient.

  • For one second dip the bottom three quarters of the napkins into the dye and immediately rinse them in cold water, making sure to rinse them from the top, down, so that the dye rinses toward the darkest part of the napkin.
  • After they are thoroughly rinsed so that the water runs clear, hang them dry with the darkest part of the napkin at the bottom. If you have 4-6 skirt hangers, they will dry much faster if they are hung separate.
  •  Once they have completely dried, run them through the wash with cold water and dry them. You will most likely need to iron them as well.

Adding the Blanket Stitch

I wanted to add a little something extra to make these a little more fun. They looked good without the stitching, but I thought the stitching added what I was looking for to make a more unique look.
I used two bundles of thread (brand: DMC, color: 959) to run the blanket stitch on just the top and bottom. I also used the full thickness of the embroidery thread to get a bolder line with the stitch. It had been quite a while since I have done a blanket stitch, so I used the following diagram as a refresher:

aaand....you're done!


February 11, 2013

Valentine’s Day Dessert: Chocolate Lava Cake

Title Graphic copy
With all of this love in the air, I figured what better time is there to make a seriously decadent, delicious desert to share with my sweetie. I have actually wanted to tackle a molten chocolate lava cake for some time and haven’t had the excuse to do it. Enter Valentine’s Day!! This is a variation of a Ghirardelli recipe. I made a couple of changes for both taste and convenience that worked well for me.
finished cake image

Ingredients

  • 6 oz 60% cocao bittersweet baking chocolate bars
  • 1/4 cup heavy cream
  • 8 Tablespoons butter (1 stick)
  • 2 eggs
  • 2 egg yokes
  • 1/3 cup sugar
  • 1/2 teaspoon vanilla extract
  • 1/4 cup cake flour
  • 12 ounces of unsweetened frozen raspberries, thawed
  • 1/2 cup simple syrup (equal parts sugar and water melted)
  • Fresh raspberries and mint leaves for garnish

Let’s get baking:

1. Melt 2 ounces of chocolate and cream in a double boiler. Whisk until smooth. Put the melted mixture in the refrigerator for about 2 hours or until firm. After the chocolate mixture has set form into 6 balls.
chocolate centers
To make these little beauties with ease, I used a wet teaspoon (wetting in between each scoop) to drag across the bottom of my double boiler until the ball was formed. The water helped release the chocolate from the spoon without any messy sticking. After portioning out the chocolate, refrigerate until needed.
2. Prep for the cakes: preheat the oven to 400 degrees and spray six 6 ounce ramekins with baking spray. For cakes that I need to release cleanly from their baking vessel, I always use cooking spray with flour such as Baker’s Joy.